Dataset cleansing is an essential step in data analysis as it ensures your dataset’s accuracy and consistency and helps remove its inconsistencies and errors. Using the dataset without proper data cleansing activity will result in improper value and wrong insights into the organizations’ data-driven decisions.
In this blog post, we will see how to get the best-curated output from a raw dataset by first cleaning them using PowerBI followed by using the CleanLab Studio (No Code) tool.
Tools & Dataset used:
PowerBI Desktop version, CleanLab app, tweets_dataset.csv
PowerBI:
Power BI is a powerful tool for data visualization and analysis, but it also offers several features to help you clean and prepare your data for analysis. One of the most useful features is the Power Query Editor, which allows you to connect to various data sources, apply transformations and load the data into Power BI.
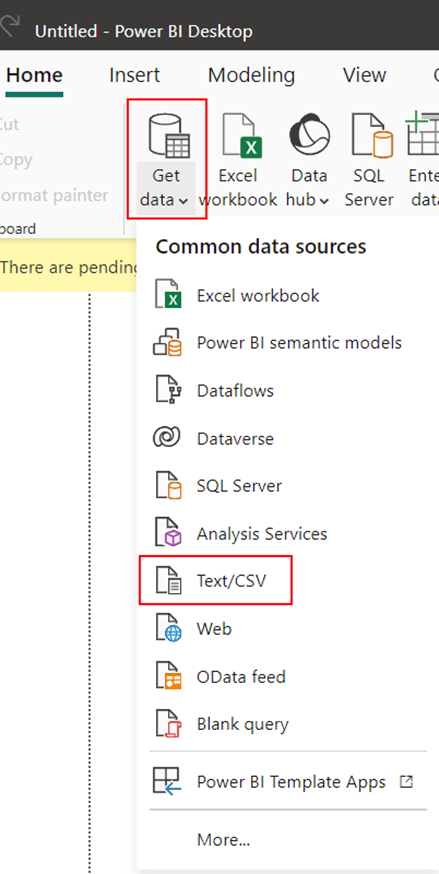
To access the Power Query Editor, you must first connect to a data source in Power BI. You can do this by clicking on the “Get Data” button in the Home tab and choosing the type of data source you want to connect to.
Once you connect to a data source, you will see a preview of the data in the Navigator pane. You can select one or more tables or queries from the data source and click on the “Transform Data” button. This will open the Power Query Editor, where you can start cleaning your data.
The Power Query Editor has a ribbon with various tabs and buttons that allow you to perform different data-cleaning operations. Some of the most common operations are:
Removing duplicates: You can use the “Remove Rows” button in the Home tab to remove duplicate rows from your data. You can also use the “Remove Duplicates” button in the Transform tab to remove duplicate values from a specific column.
Filtering data: You can use the filter icon in the column header to filter your data based on specific criteria. You can also use the “Filter Rows” button in the Home tab to filter your data based on text, numbers, dates, or null values.
Handling missing or null values: You can use the “Replace Values” button in the Transform tab to replace null values with a specific value. You can also use the “Fill” button in the Transform tab to fill up or down null values based on the values in the adjacent cells.
Changing data types: You can use the “Data Type” button in the Home tab to change the data type of a column. You can choose from various data types, such as text, number, date, time, or decimal number.
Renaming columns and queries: You can use the “Rename” button in the Home tab to rename a column or a query. You can also double-click on the column header or the query name to rename it.
Combining tables: You can use the “Append Queries” or the “Merge Queries” buttons in the Home tab to combine two or more tables into one. You can append tables by adding rows from one table to another, or merge tables by joining them based on a common column. Pivoting and unpivoting data: You can use the “Pivot Column” or the “Unpivot Columns” buttons in the Transform tab to change the structure of your data. You can pivot a column by turning its unique values into new columns, or unpivot columns by turning multiple columns into rows.
After you finish cleaning your data in the Power Query Editor, you can click on the “Close & Apply” button in the Home tab to load the data into Power BI.
These are just some of the basic data-cleaning techniques that you can use in Power BI. There are other techniques available that can be explored, such as grouping rows, splitting columns, adding custom columns, or applying conditional logic in the Advanced Editor which requires further expertise, time, and resources.
What if we have a tool that can do all these steps with simple clicks? through No-Code, which can provide us with a curated dataset that can be used straight away in the reports. One such tool is called CleanLab.ai. We will now see how CleanLab handles raw data into an actionable dataset.
CleanLab Studio:
Cleanlab Studio is a no-code automated data correction interface that helps you fix mislabelled data, remove out-of-distribution data, and rank data by quality. It can be used with many types of data, such as text, images, audio, video, and tabular data.
To get started with Cleanlab Studio, you need to sign up for a free trial from the Cleanlab.ai website, log into your account, upload a dataset, and optionally download the Cleanlab columns that indicate the errors and quality of your data. We will try the app by using a sample dataset called ‘Tweets_dataset.csv’ convert it into a quality dataset and look at all the steps in the process. Additionally, it also offers multiple types of datasets to be downloaded if you want to try your hand after signing up.
- Uploading the dataset file from my local disk

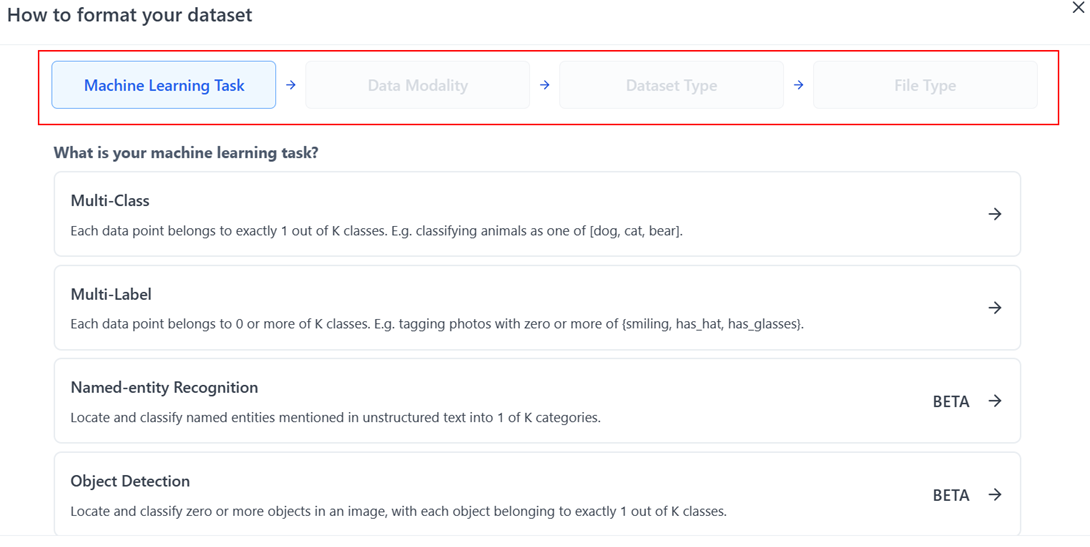
- Format the dataset: Once when you click on the ’How to Format’ button you can see multiple options that are present purpose-built for your machine learning workloads. You can use it if you have image segmentation, Named-entity recognition, or objection detection use cases.
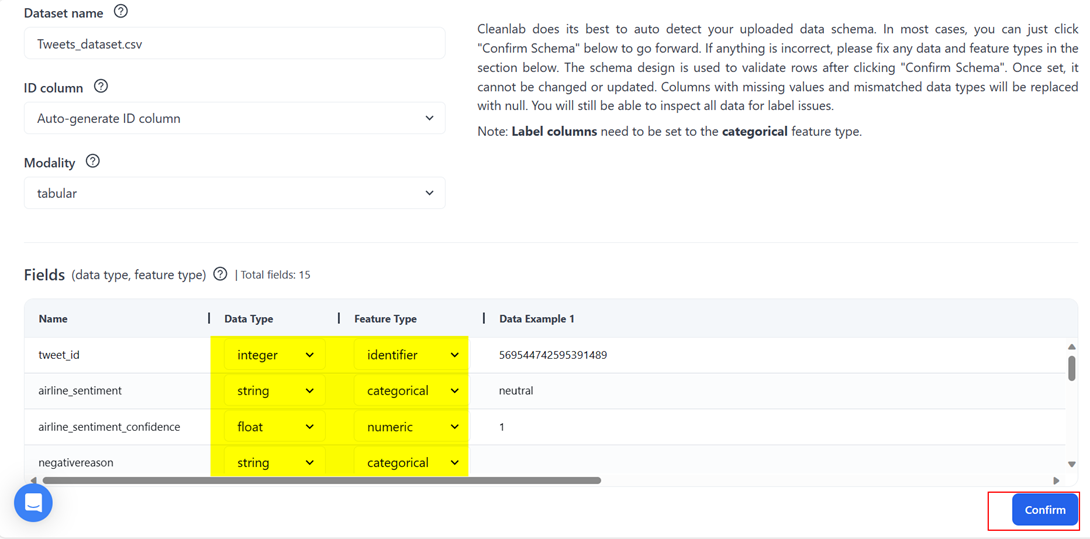
- Infer schema and Create project: Once you have uploaded the dataset the Cleanlab studio will automatically infer its schema by verifying the data types, and feature types for all the fields. You must only require to review and confirm the schema. Once confirmed, now you can preview the data present in your dataset and create a project.
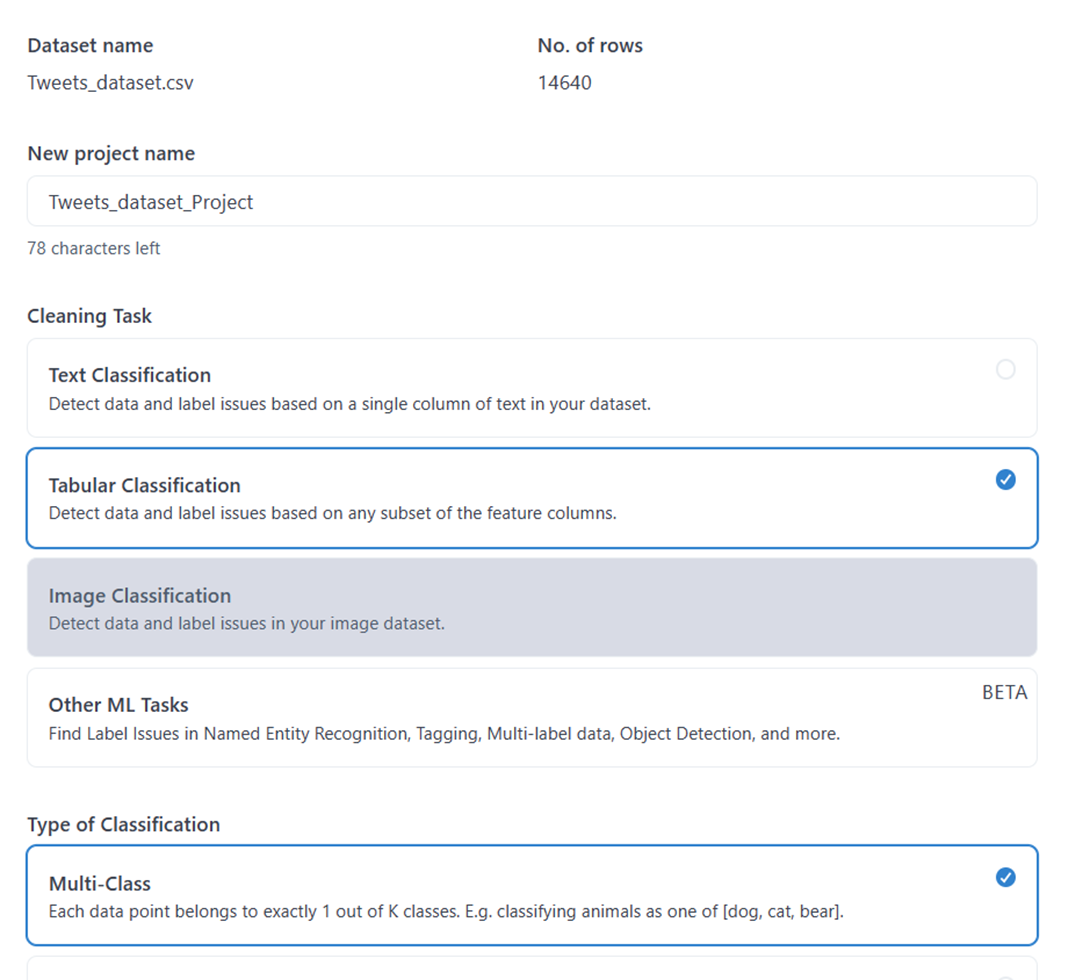
There are a few options to configure when creating a project:
- Machine Learning Task: What type of task are you training a model to accomplish? Currently, we support Classification for text, tabular, and image datasets.
- Type of Classification: Classification tasks are either multi-class (a datapoint is assigned to 1 of K classes) or multi-label (each datapoint can be part of 0 to K of K classes).
- Label Column: The column in your dataset that you want us to find label errors in and suggest label corrections on. Some examples in the dataset may be unlabelled.
- Predictive Columns / Text Column: Depending on your machine learning task, you’ll be asked to specify which columns we should use to train our classification models on.
- Model Type: Fast mode trains and suggests corrections quicker, but may produce lower quality results, while regular mode will give the best results but could take up to 24 hours for large datasets.
After specifying the columns that Cleanlab can consider as the predictors of the label, you will have two options: fast and regular, I have selected regular for quality results.
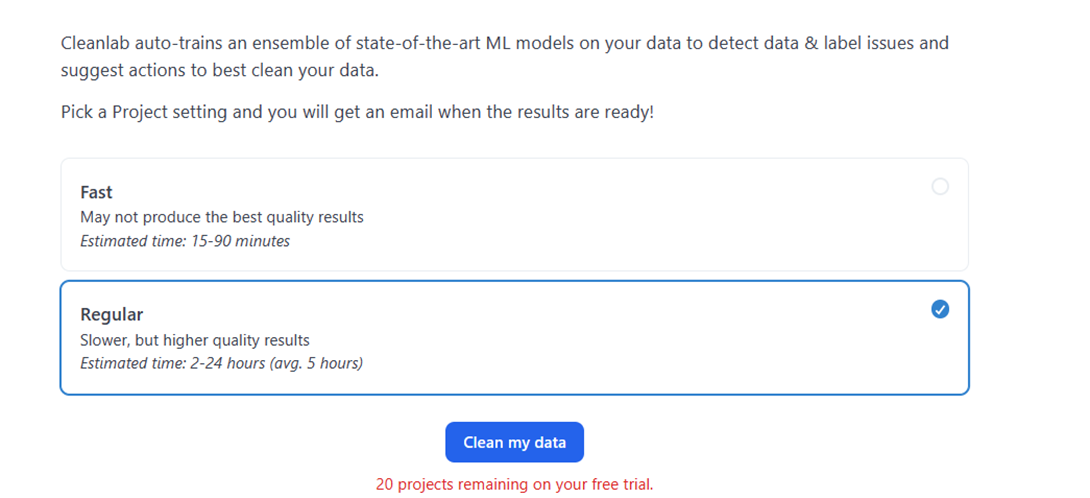
Now go ahead and click on the ‘Clean My Data’ button for the AI cleansing process to get started. Once you click you will get a message that you will receive an email once the process has been completed, which is cool! You don’t have to wait glued at the dashboard for it to get completed.
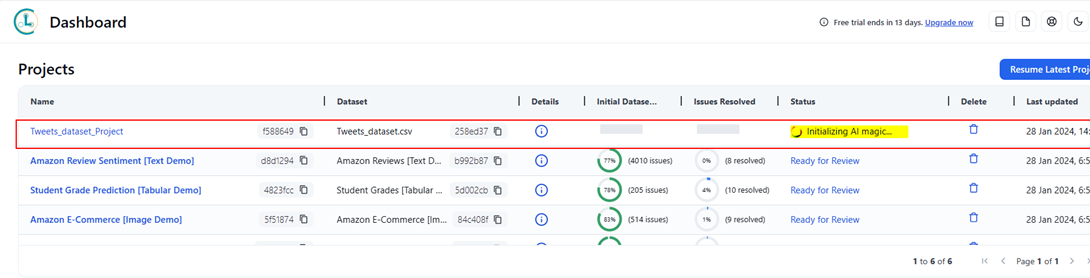

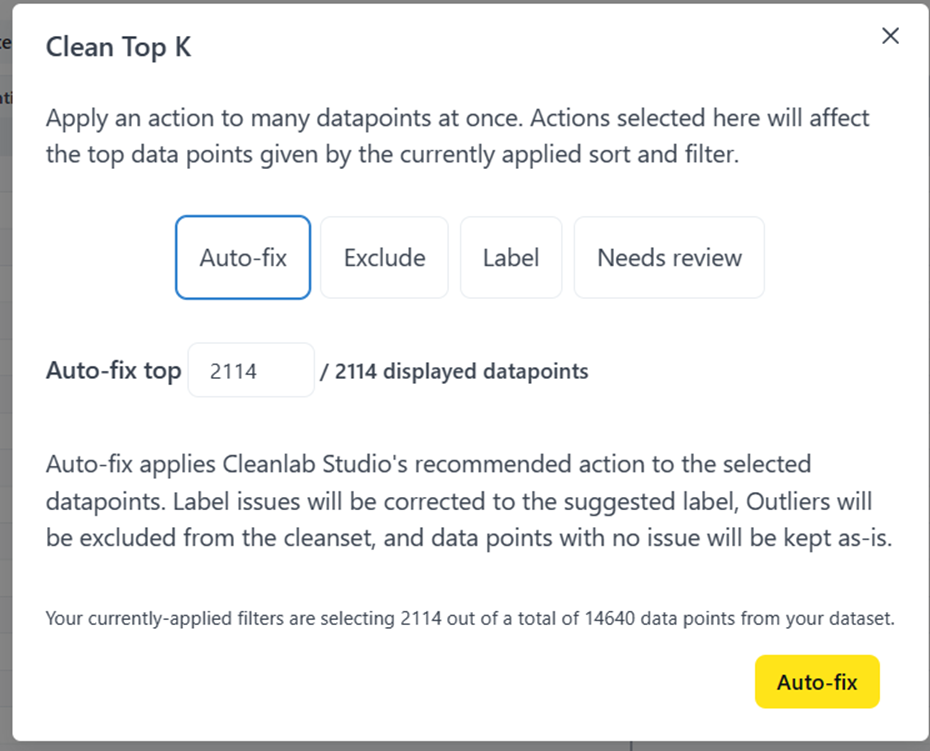
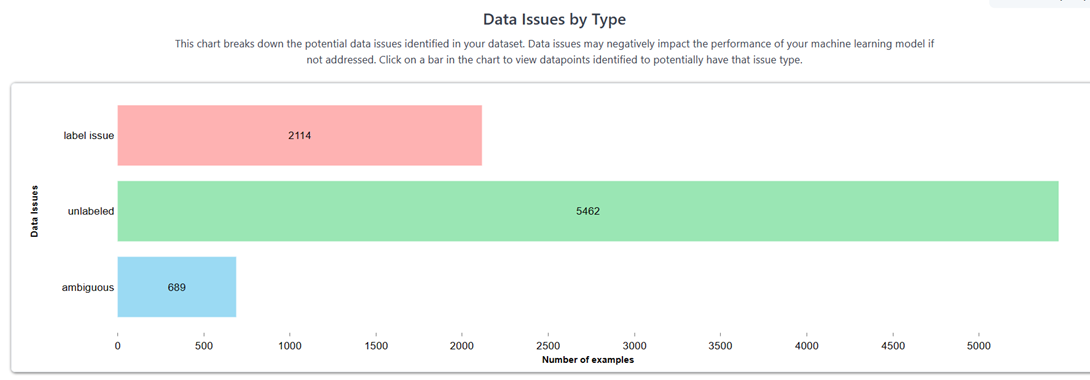
Once completed, if you click on the ready to review you can see the errors that Cleanlab has identified. It flags the label issues, and it also suggests a better label that might suit this situation. You can ‘Auto-Fix top issues’ to complete it in one go or if you have time, you can review the flagged issues which will bring quality to your dataset. With Cleanlab Studio, you can easily correct label errors in your data. The interface shows you the data quality ranking, so you can focus on reviewing the data that requires attention (and skip the data that is already clean). You can also opt to remove data points that are outliers: these are the data points that do not belong to any of the classes in your dataset. Once this is all done, now you have a clean & confident dataset that is ready for the reporting requirements to produce better conclusions.
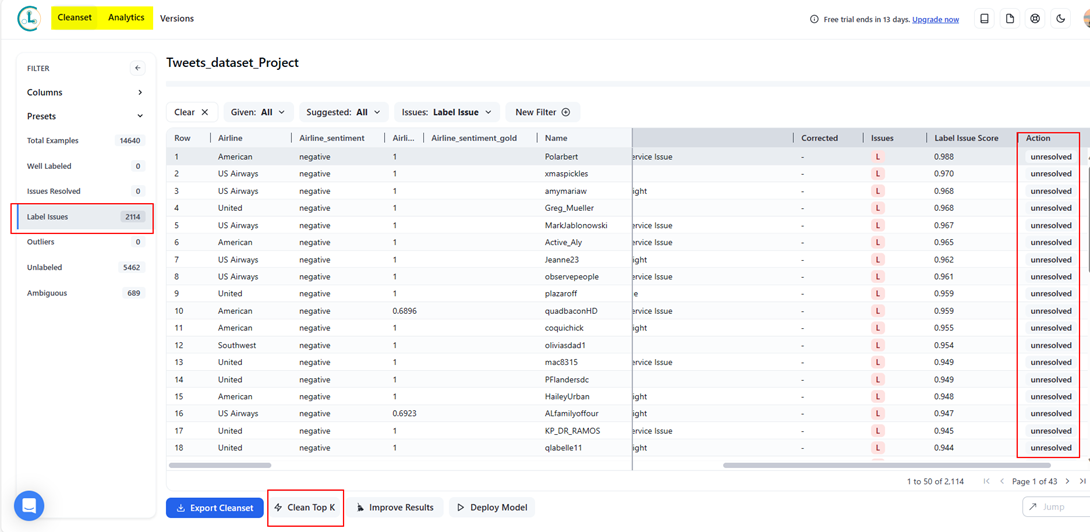

All these can be seen in the ‘Cleanset’ tab. Next to it is the Analytics tab which gives you information about the classes with most of the label issues, commonly suggested corrections, etc. This is a high-level summary.
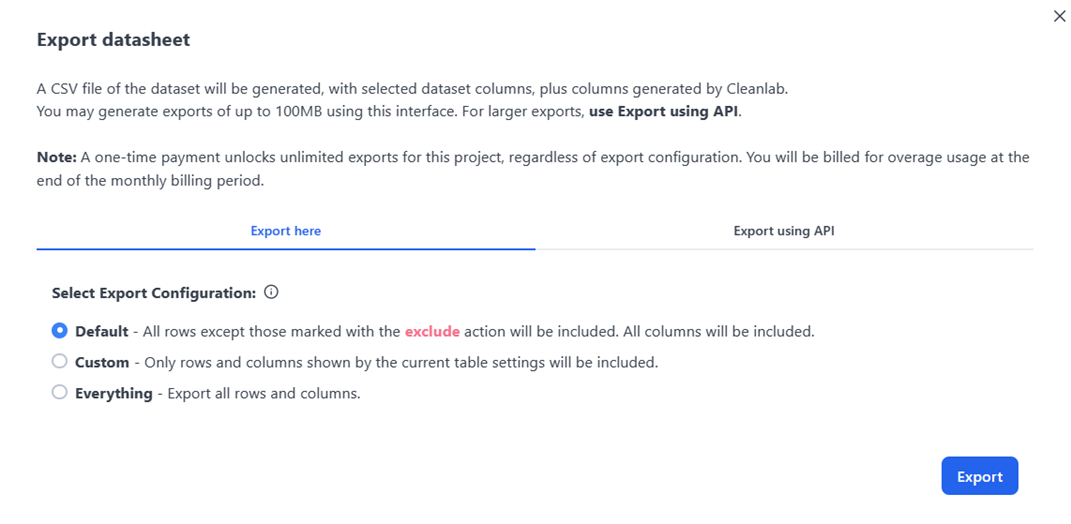
Export the dataset: If you are happy with the quality of the dataset, you can export the output from the ‘Cleanset’ tab into your local drive.

Hope this article gave a basic understanding of Cleanlab studio as well as a perspective of how it fares when compared to PowerBI. We could see how Cleanlab Studio made it easier to handle daunting tasks like data cleansing so easy compared to native methods, especially when dealing with PowerBI. Also, Cleanlab has a fantastic support channel on both Slack and as well as in E-mail for your questions with their engineers.
References:
https://help.cleanlab.ai/guide/quickstart/web/
https://www.process.st/how-to/clean-data-in-power-bi/
https://zebrabi.com/guide/how-to-clean-data-in-power-bi/